Blocks allow you to store, copy, move, rotate, scale, and modify objects as one object. Blocks are created using drawing tools like lines or circles. This tutorial will show how blocks work and how they can be used by changing the properties of an example block.
When you select the shapes representing the desired objects for your block, these shapes are converted into a single object referred to as a “block”. The original shape is then saved within the block’s definition so it may be reused without creating new geometry each time it is needed; this process is called cloning. Visit website to find out more about Autocad right now. You can also insert existing geometry into other drawings by inserting the blocks that represent the desired geometry.
Autocad Block
Creating a block is a fairly straightforward process and involves the following steps:
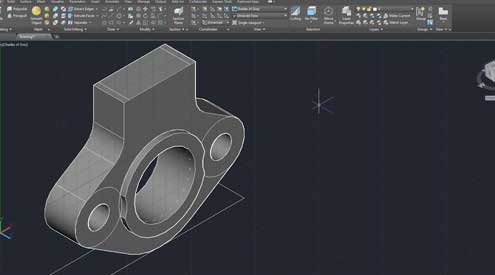
Step 1: It is important to draw the object you want in your block before you create it. Consider for the purpose of this how-to that you are starting with a simple circle. Select the circle and press F8 to convert your selection to an Object. Press enter on a keyboard or double-click the right mouse button to accept the start point location. Then specify the first corner for creating a block. Now you can see that how the command line will display there are no objects is selected.
Step 2: Select the Home tab followed by the Block panel, then click on the Create button to begin the BLOCK command. An open dialog box will appear with the Block Definition specified.
Step 3: The text box for Name should be filled with the name that you would like to use. You can put space between the names.
Step 4: Click OK, and a window will open displaying all objects that have been selected for inclusion in this block if you are using AutoCAD 2011 or a newer version of the software or select Cancel to exit without adding anything to your newly created block.
Step 5: In this window, click OK, accept default settings, and click Close.
Step 6: AutoCAD will prompt you to enter a name for the block that it is about to create in the command line and asking if you wish to keep this new block in your current drawing only, in any drawing opened in this session of Autocad or save it as part of its template file so that all new drawings to be created in this session of Autocad will contain the new block as well.
Step 7: Once your new block has been saved, you can use it for inserting into other drawings by going to Insert > Block and selecting your newly created block from drop-down box or browse button located on the right hand side of the dialog box.
Step 8: Click OK to insert your newly created block into the drawing area. You can now edit its insertion point, scale or rotation if you want to do so in the future by going to Modify option under the Block panel on the Home tab of the Autocad ribbon.
Conclusion
Suppose the things are not present on one layer. Then, AutoCAD will ask you whether to create a new layer or merge existing layers before creating blocks. AutoCAD’s newer versions require you to select objects to include in a new block from a drawing window when creating a new block. You can then save and insert blocks as you create them.
AutoCAD tutorial began with how to make a block in AutoCAD, and how to use blocks in AutoCAD was explained neem. Using this tutorial, you will learn how to create a block in AutoCAD, how to use blocks in AutoCAD, and how they work.